Session 11 - Images and the Web
While imaging is not actually included in the elements for this subject/units, this topic is very relevant for creating high quality websites.
The following notes are a hotch potch of information that is delivered as part of Certificate IV, focusing on imaging concepts relevant for your websites.
The term "pixel" is actually short for "Picture Element." These small little dots are what make up the images on computer displays, whether they are flat-screen (LCD) or tube (CRT) monitors. The screen is divided up into a matrix of thousands or even millions of pixels. Typically, you cannot see the individual pixels, because they are so small. This is a good thing, because most people prefer to look at smooth, clear images rather than blocky, "pixelated" ones. However, if you set your monitor to a low resolution, such as 640x480 and look closely at your screen, you will may be able to see the individual pixels. As you may have guessed, a resolution of 640x480 is comprised of a matrix of 640 by 480 pixels, or 307,200 in all. That's a lot of little dots.
Each pixel can only be one color at a time. However, since they are so small, pixels often blend together to form various shades and blends of colors. The number of colors each pixel can be is determined by the number of bits used to represent it. For example, 8-bit color allows for 2 to the 8th, or 256 colors to be displayed. At this color depth, you may be able to see "graininess," or spotted colors when one color blends to another. However, at 16, 24, and 32-bit color depths, the color blending is smooth and, unless you have some kind of extra-sensory vision capability, you should not see any graininess.
If you increase the size of an image with a low resolution, you will start to see the blocky pixels. It is best to get an image with a higher resolution and reduce the size. Here is an example:
The first image is at its full resolution 3648 X 2736 and is 3.74mb. On a side note - this file took ages to upload into Blogger.

This is displayed at Blogger's "Large" size.
The following is the exact same image, but displayed in Blogger at "Original Size"
This is the same image that I have reduced to 150 pixels wide X 113 high, displayed at "Large" size

and the same image at "Original Size"
To put this in perspective, my screen resolution at home is 1920 X 1080. The image, at resolution of 3648 X 2736, is almost twice the width and more than twice the height of my screen.

When you search for images on the Internet, as well as Copyright issues, you also need to consider the resolution of the images. For high quality images that are licensed under Creative Commons Zero (0), I recommend Pixabay
It has been created by a company called Autodesk, which has been a big name in CAD and 3D software for a long time.

Click on the little blue arrow to start.

Once you have browsed and located an image, Pixlr Express will load and display the menu options that are available.
These are your choices:

Sometimes there are special occasion themes for events such as Mother's Day and Halloween.
Within each of these categories, you have lots of other tools. Let's start with Adjustments.


All of the above are tasks that you can perform using the Adjustment category.

Once you click on the Browse button, you can scroll to and open your USB drive, or wherever you have saved the photos, and select the image that you want to crop. It will then be loaded into Pixlr Express.

You will be able to see the categories of tools at the bottom of your picture.
Choose the Adjustment Category, and then select the Crop Tool.

Your now cropped image will be displayed.


Click the Save button - top left of the browser window, to save your cropped image.
Give your image a name, select the quality, click on Save. You can choose a different location to save the file if necessary.
You can also use the Crop tool to apply some of the composition rules that we looked at last week, such as . "Rule of Thirds" or "Filling the Frame" composition. The example above changes the composition to "Filling the Frame".
Rotate is pretty self explanatory - it allows you to rotate your image to straighten it or to get a particular effect.


You could use Rotate to straighten up an image for "Straight Horizons".
Depending on the purpose for the image, resizing may be required. You can Resize an image by cropping it - selecting the part of the image that you want, or by changing the pixel dimensions.
To change the size of the image in regards to the amount of storage, resizing the pixels and/or adjusting the quality when you save the image are both methods that can be used.


You can adjust the quality and give the image a new name. When you click on Save, you will be able to select the location to save to.

You Can:


When you click Finished, the collage is opened up in Pixlr Express where you can make even more adjustments and save it.

This is a bit messy, but the following image explains what each of the tools do. It kinda grew as I was going.

You can also find information about the toolbar here https://pixlr-old.zendesk.com/hc/en-us/articles/202274264-The-Pixlr-Editor-toolbar-explained
Or if you prefer a video, click here
The best way to see what these tools do is to play with them!! BUT Before we do, the first thing we need to understand about Pixlr (and similar photo editing tools) is that they work with layers.
I will start with some of the Selection tools and go from there. For this exercise, I have loaded an image from my computer.


Watch the Video here

Once you are happy with the selection, you can apply a variety of tools or you can copy and paste it onto another image. The magic wand works best when there are solid colours. To see how well this worked on my image, I will invert the selection and cut the selection.


Not perfect, but not too bad.
The Lasso tool allows you to draw around the edge of the item you want to select. There are 2 different lasso tools that you can select from the options. The freehand lasso and the polygonal lasso. The freehand lasso is where you can use the mouse to trace over the selection. The polygonal tool allows you to click the mouse and place markers along the way. Shift key adds and the Alt (option) key subtracts points.


A simple Cut and Paste onto another image will show how well my selection went.

Online Tutorial from Pixlr - https://www.youtube.com/watch?v=CYyc5Gk7JGw


For this exercise, I have started an image from scratch using the default size

You can start by adding a plain or gradient background colour, or create colours using shapes. All of the tools have separate options so make sure that you look at what is available.


When you use the gradient tool, you can use one of the predefined styles or create your own.


Lots of different brushes available. Use the More button to add them to your pallette.


So my masterpiece......


From Pink to blue.

Tutorial on colour replacement tool

Take a sample from somewhere near that can replace the area you are removing, and then just paint away.

For more information on the the Clone Tool
Red Eye reduction essentially paints over the area in black, hence removing the red eye or flash reflection from your image.
Logo Maker
The following notes are a hotch potch of information that is delivered as part of Certificate IV, focusing on imaging concepts relevant for your websites.
Pixels and Resolution
It's all about the Pixels
You have all heard the term, but what actually is a pixel. This definition is from http://www.techterms.com/definition/pixel and defines the term in plain english.The term "pixel" is actually short for "Picture Element." These small little dots are what make up the images on computer displays, whether they are flat-screen (LCD) or tube (CRT) monitors. The screen is divided up into a matrix of thousands or even millions of pixels. Typically, you cannot see the individual pixels, because they are so small. This is a good thing, because most people prefer to look at smooth, clear images rather than blocky, "pixelated" ones. However, if you set your monitor to a low resolution, such as 640x480 and look closely at your screen, you will may be able to see the individual pixels. As you may have guessed, a resolution of 640x480 is comprised of a matrix of 640 by 480 pixels, or 307,200 in all. That's a lot of little dots.
Each pixel can only be one color at a time. However, since they are so small, pixels often blend together to form various shades and blends of colors. The number of colors each pixel can be is determined by the number of bits used to represent it. For example, 8-bit color allows for 2 to the 8th, or 256 colors to be displayed. At this color depth, you may be able to see "graininess," or spotted colors when one color blends to another. However, at 16, 24, and 32-bit color depths, the color blending is smooth and, unless you have some kind of extra-sensory vision capability, you should not see any graininess.
Image Resolution
So why is resolution important? Depending on the what you will use the images for, you may need a higher resolution or a lower one. If you wanted to create a large poster, you need high quality images i.e. images with a very high resolution. If you are creating thumbnails for a web based image gallery, then the size of the image is not so important and you would probably want a lower resolution so that they load up quickly.If you increase the size of an image with a low resolution, you will start to see the blocky pixels. It is best to get an image with a higher resolution and reduce the size. Here is an example:
The first image is at its full resolution 3648 X 2736 and is 3.74mb. On a side note - this file took ages to upload into Blogger.
This is displayed at Blogger's "Large" size.
The following is the exact same image, but displayed in Blogger at "Original Size"
This is the same image that I have reduced to 150 pixels wide X 113 high, displayed at "Large" size
and the same image at "Original Size"
To put this in perspective, my screen resolution at home is 1920 X 1080. The image, at resolution of 3648 X 2736, is almost twice the width and more than twice the height of my screen.

When you search for images on the Internet, as well as Copyright issues, you also need to consider the resolution of the images. For high quality images that are licensed under Creative Commons Zero (0), I recommend Pixabay
Pixlr - Simple online image editing
Pixlr would have to be one of my favourite multimedia applications. It is essentially a photo editing application and has some similarities with Photoshop when you use the Pixlr editor, but also has the easier application called Pixlr Express. The reason I like it so much is that it has an extremely functional free option, but is still very powerful. Its only downfall is the advertisements that appear on the right hand side of the screen, but I think that is only a small inconvenience.It has been created by a company called Autodesk, which has been a big name in CAD and 3D software for a long time.

Click on the little blue arrow to start.

Pixlr Express
We will start by exploring Pixlr Express.Adjustments
The first section that we will be looking at is the basic adjustments that you can easily do with Pixlr Express.Once you have browsed and located an image, Pixlr Express will load and display the menu options that are available.
These are your choices:

Sometimes there are special occasion themes for events such as Mother's Day and Halloween.
Within each of these categories, you have lots of other tools. Let's start with Adjustments.


All of the above are tasks that you can perform using the Adjustment category.
Cropping an Image
The first enhancement we will make will be using Pixlr Express to crop an image. Start by loading Pixlr Express if you haven't already done so.
Once you click on the Browse button, you can scroll to and open your USB drive, or wherever you have saved the photos, and select the image that you want to crop. It will then be loaded into Pixlr Express.

You will be able to see the categories of tools at the bottom of your picture.
Choose the Adjustment Category, and then select the Crop Tool.

Your now cropped image will be displayed.


Click the Save button - top left of the browser window, to save your cropped image.
Give your image a name, select the quality, click on Save. You can choose a different location to save the file if necessary.
You can also use the Crop tool to apply some of the composition rules that we looked at last week, such as . "Rule of Thirds" or "Filling the Frame" composition. The example above changes the composition to "Filling the Frame".
Rotate
Rotate is pretty self explanatory - it allows you to rotate your image to straighten it or to get a particular effect.


You could use Rotate to straighten up an image for "Straight Horizons".
Resize
Resizing an image is about the pixels. An image straight from the camera is huge - both in dimensions as well as physical amount of space it takes up on your storage device.Depending on the purpose for the image, resizing may be required. You can Resize an image by cropping it - selecting the part of the image that you want, or by changing the pixel dimensions.
To change the size of the image in regards to the amount of storage, resizing the pixels and/or adjusting the quality when you save the image are both methods that can be used.

Adding/combining images
You can create your own collage or combine different images onto one.


Saving Your Masterpiece
You can save your adjusted image by clicking on Save in the top left hand corner.
You can adjust the quality and give the image a new name. When you click on Save, you will be able to select the location to save to.
Other Adjustments
There are lots of other things that you can do with Pixlr Express. Here are just a few examples. |
| Use Colour to make an image black and white |

 |
| Use Brighten to lighten specific areas of your image |
 |
| Use Splash to add "splashes" of colour |
 |
| Use Focal to have a focal point on your image - the areas around it will be blurred. |
Class Activity 2
Again, using you photos, try out some of the other features of Pixlr Express Adjustment tools. Post "before" and "After" images in our Facebook group.Other Pixlr Express Tools
There are lots of other tools in Pixlr Express that you can use to have some fun with your images.You Can:
 |
| Apply an Effect |
 |
| Add an Overlay |
 |
| Put a border around your image |
 |
| Add Stickers |
 |
| Or add some creative Text |
Collage
Pixlr Express also has a cool Collage Tool that you can use to create a variety of photo montages.


When you click Finished, the collage is opened up in Pixlr Express where you can make even more adjustments and save it.
The Pixlr Editor Tools
The Toolbar is located on the left hand side of the screen.
If you have used Photoshop or similar editing tools before, you should find the screen layout quite familiar.
This is a bit messy, but the following image explains what each of the tools do. It kinda grew as I was going.

You can also find information about the toolbar here https://pixlr-old.zendesk.com/hc/en-us/articles/202274264-The-Pixlr-Editor-toolbar-explained
Or if you prefer a video, click here
The best way to see what these tools do is to play with them!! BUT Before we do, the first thing we need to understand about Pixlr (and similar photo editing tools) is that they work with layers.
Layers
https://www.youtube.com/watch?v=txP6b8ZeRUcI will start with some of the Selection tools and go from there. For this exercise, I have loaded an image from my computer.
The Basics - Crop and Resizing
You can crop an image by selecting the area and choosing Crop from the Image menu or you can use the crop tool.


Watch the Video here
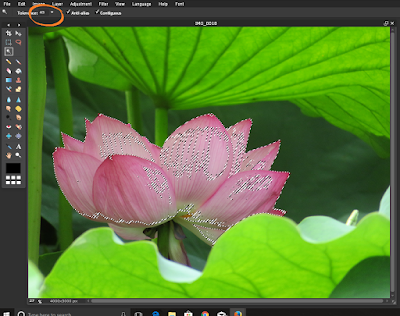
Marquee, Lasso and Wand
The Magic Wand tool allows you to select pixels within a colour range. You can increase the tolerance to select a larger variation from the selection. If you hold the Shift key down, you can add to your selection or use the Ctrl key to take away from the selection.

Once you are happy with the selection, you can apply a variety of tools or you can copy and paste it onto another image. The magic wand works best when there are solid colours. To see how well this worked on my image, I will invert the selection and cut the selection.


Not perfect, but not too bad.
The Lasso tool allows you to draw around the edge of the item you want to select. There are 2 different lasso tools that you can select from the options. The freehand lasso and the polygonal lasso. The freehand lasso is where you can use the mouse to trace over the selection. The polygonal tool allows you to click the mouse and place markers along the way. Shift key adds and the Alt (option) key subtracts points.


A simple Cut and Paste onto another image will show how well my selection went.

Online Tutorial from Pixlr - https://www.youtube.com/watch?v=CYyc5Gk7JGw


Drawing tools
For this exercise, I have started an image from scratch using the default size

You can start by adding a plain or gradient background colour, or create colours using shapes. All of the tools have separate options so make sure that you look at what is available.


When you use the gradient tool, you can use one of the predefined styles or create your own.


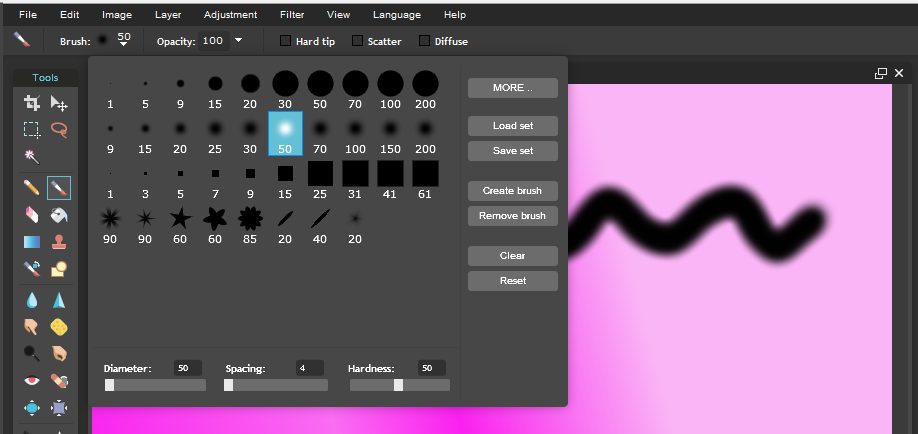
Lots of different brushes available. Use the More button to add them to your pallette.


So my masterpiece......

Text
The Text tool allows you to add text to your image. You can change font, size and text colour.
Photo Editing Tools
Colour Replacement
You can use the Colour Replacement tool to change a colour within your image. The colour replacement tool keeps the original shadings of your selection and colours it to your main coour.From Pink to blue.

Tutorial on colour replacement tool
Clone Tool
You can use the Clone tool to remove items from your image.
Take a sample from somewhere near that can replace the area you are removing, and then just paint away.

For more information on the the Clone Tool
Spot Heal and Redeye Reduction
The Spot Heal in the Pixlr Editor works in the same way as Pixlr Express. The Spot Heal tool will look at the surrounding pixels and allow you to remove small blemishes or scratches from a photo.Red Eye reduction essentially paints over the area in black, hence removing the red eye or flash reflection from your image.
Other Tools
CanvaLogo Maker

Comments
Post a Comment